 NebulaStream Docs
Development
This document explains how to set up the development environment for NebulaStream. We distribute a development container image to enable anyone interested hacking on the system as quickly as possible. Additionally, for long-term developers or developers disliking developing in a containerized environment, this document explains how to set up and build NebulaStream in a non-containerized environment.
Development Container
To set up a development container, always use the provided installation script:
./scripts/install-local-docker-environment.sh
This script ensures that a suitable development image is available locally. It will automatically pull a pre-built image that matches the current dependency hash, or build one locally when needed. Local builds also install the current user inside the container, preventing permission issues.
If you are using Docker in rootless mode, the user inside the container will be root.
[!NOTE] The Dockerfiles use BuildKit features (e.g.,
--mount,--chmod,--checksum). The installation script enables BuildKit automatically (DOCKER_BUILDKIT=1). If you invokedocker buildmanually, make sure BuildKit is enabled, either by settingexport DOCKER_BUILDKIT=1or by usingdocker buildx build.
[!WARNING] The logic for detecting root mode is not perfect. If you encounter permission problems you may have to force root mode using the
-rflag.
[!IMPORTANT] If running on an arm64 / aarch64 architecture, ensure that any container images used are built for the
linux/arm64target. Otherwise, builds may be slow or fail due to architecture emulation. If you are intentionally cross-compiling for amd64 on an Apple ARM processor using Docker on Colima and encounter crashes, you may need to disable Rosetta.
If no pre-built image matches the current dependency hash, the script will build the development environment locally (equivalent to using the -l flag).
Note that we currently do not provide pre-built libstdc++ images for ARM, but the script can build them locally when requested.
If the dependency hash mismatches but you are certain that none of the files in docker/ or vcpkg/ have been modified, please submit a bug report, as the hash function may not be working correctly on your system.
You may also select libstdc++ instead of the default libc++ using the --libstdcxx flag.
Using libstdc++ leads to better resolution of debug symbols on Linux, using CLion.
[!NOTE] We currently do not provide pre-built
libstdc++development images for ARM architectures.
However, you can build them locally by using the-lflag with the installation script.
[!NOTE] All commands need to be run from the root of the git repository!
[!NOTE] Windows Line Endings
If you are working on Windows, some scripts may fail to run if they use Windows-style CRLF line endings.
Ensure that the following files use LF line endings:
./scripts/install-local-docker-environment.sh./docker/dependency/hash_dependency.shScripts will not execute correctly under Git Bash or Cygwin if they contain CRLF line endings. You can switch line endings in most editors (e.g., VS Code, Notepad++, IntelliJ) via the status bar.
The image contains an LLVM-based toolchain (with libc++), a recent CMake version, the mold linker and a pre-built development sdk based on the vcpkg manifest.
This container image can be integrated into, e.g., CLion via a docker-based toolchain or used via the command line.
To configure the cmake build into a build-docker directory, you have to mount the current working directory pwd into
the container. Additional cmake flags can be appended to the command.
docker run \
    --workdir $(pwd) \
    -v $(pwd):$(pwd) \
    nebulastream/nes-development:local \
    cmake -B build-docker
The command to execute the build also requires, the current directory to be mounted into the container.
docker run \
    --workdir $(pwd) \
    -v $(pwd):$(pwd) \
    nebulastream/nes-development:local \
    cmake --build build-docker -j
To run all tests you have to run ctest inside the docker container. The ‘-j’ flag will run all tests in parallel. We refer to the ctest guide for further instruction.
docker run \
    --workdir $(pwd) \
    -v $(pwd):$(pwd) \
     nebulastream/nes-development:local \
     ctest --test-dir build-docker -j
Packaging binaries into Docker images
The package-docker-images-all CMake target builds the runtime base and packages every executable image;
package-docker-<nes-cli|nes-repl|nes-repl-embedded|nes-worker> packages a single one. They require a reachable Docker
daemon — inside the development container that means mounting the docker socket, as for the docker-based
e2e tests — and are excluded from the default build. See
packaging Docker images for individual targets and tag configuration.
Code style & static analysis
Code style and static analysis are available as CMake targets, so you do not need to invoke clang-format or
clang-tidy by hand:
format/check-format— run clang-format (apply in place / check only).tidy-diff/tidy-diff-fix— run clang-tidy over your diff (baseNES_TIDY_DIFF_BASE, defaultHEAD).tidy-diff-to-main/tidy-diff-to-main-fix— run clang-tidy over your whole branch relative toorigin/main.tidy-full— run clang-tidy over every translation unit (what nightly CI runs).
For example, to fix clang-tidy findings on your branch inside the container:
docker run \
    --workdir $(pwd) \
    -v $(pwd):$(pwd) \
    nebulastream/nes-development:local \
    cmake --build build-docker --target tidy-diff-to-main-fix
In CLion these show up in the target dropdown and run like any other build target, so there is no need to edit the Docker toolchain environment. See fixing clang-tidy warnings for details.
Modifying dependencies
When using the docker images, it is not straightforward to edit the dependencies, as a new docker image would need to be created. Currently, the simplest solution is to create a pull request which would run the docker build on the nebulastream CI and provide a branch specific version of the development image. The development image with changed dependencies is available via:
docker pull nebulastream/nes-development:branch-name
Dependencies via VCPKG
The development container has an environment variable NES_PREBUILT_VCPKG_ROOT, which, once detected by the CMake build
system, will
configure the correct toolchain to use.
Since the development environment only provides a pre-built set of dependencies, changing the dependencies in the containerized mode is impossible. If desired, a new development image can be built locally or via the CI.
CCache
Using ccache can significantly speed up recompilation times. For optimal performance, create a dedicated ccache volume that persists across container runs:
docker volume create ccache
docker run \
    --workdir $(pwd) \
    -v $(pwd):$(pwd) \
    -v ccache:/ccache \
    -e CCACHE_DIR=/ccache \
    nebulastream/nes-development:local \
    cmake -B build-docker
Alternatively, you can share your host machine’s existing ccache directory by mounting it directly:
docker run \
    --workdir $(pwd) \
    -v $(pwd):$(pwd) \
    -v $(ccache -k cache_dir):$(ccache -k cache_dir) \
    -e CCACHE_DIR=$(ccache -k cache_dir) \
    nebulastream/nes-development:local \
    cmake -B build-docker
Unit-test binaries
NES_SPLIT_TEST_BINARIES defaults to ON and builds one executable per unit-test suite. Set it to OFF to link all
unit tests into nes-unit-tests, as CI does:
cmake -B build-docker -DNES_SPLIT_TEST_BINARIES=OFF
CLion Integration
To integrate the container-based development environment you need to create a new docker-based toolchain. With the following settings:
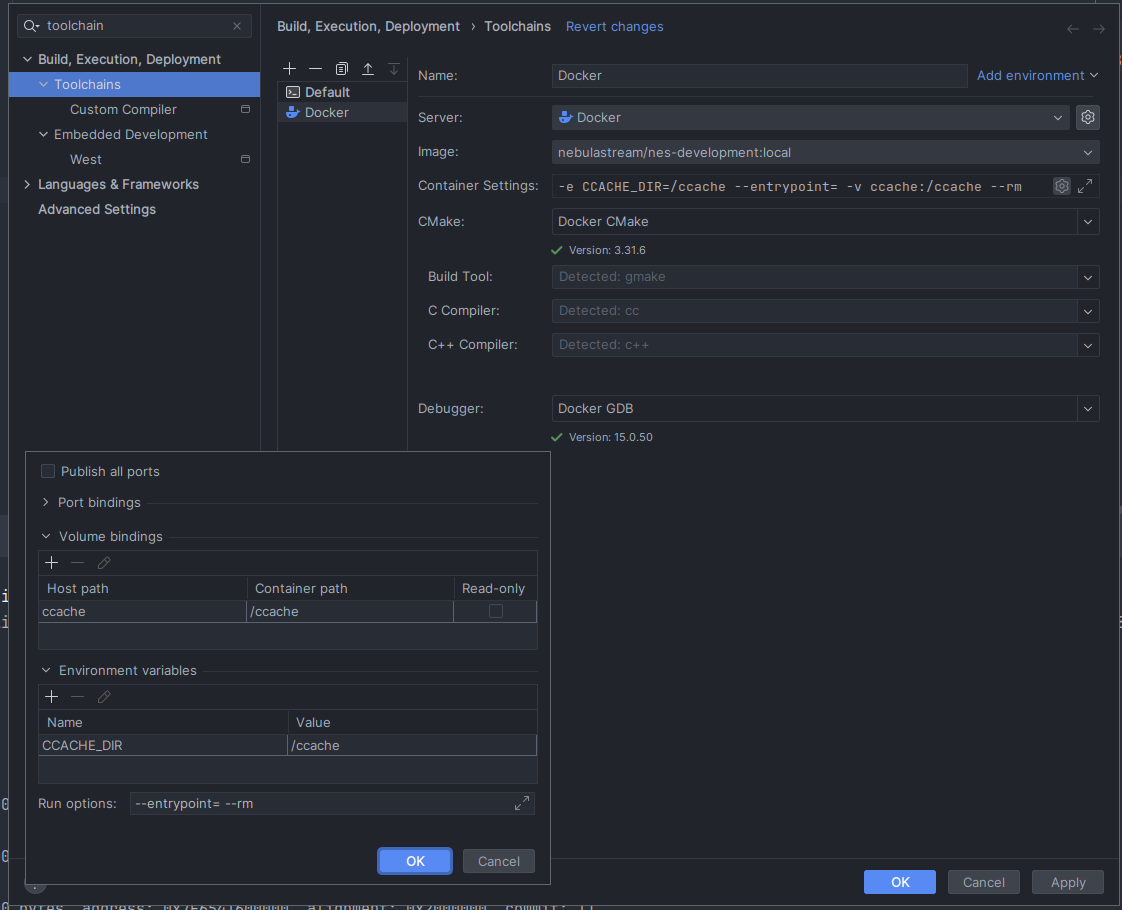
[!IMPORTANT] If running on MacOS with Colima as your docker VM, you will need to select Colima instead of the default docker daemon.
This configuration assumes ccache is using the default directory of $HOME/.cache/ccache. You can create additional
docker-based toolchains if you plan to experiment with different sanitizer.
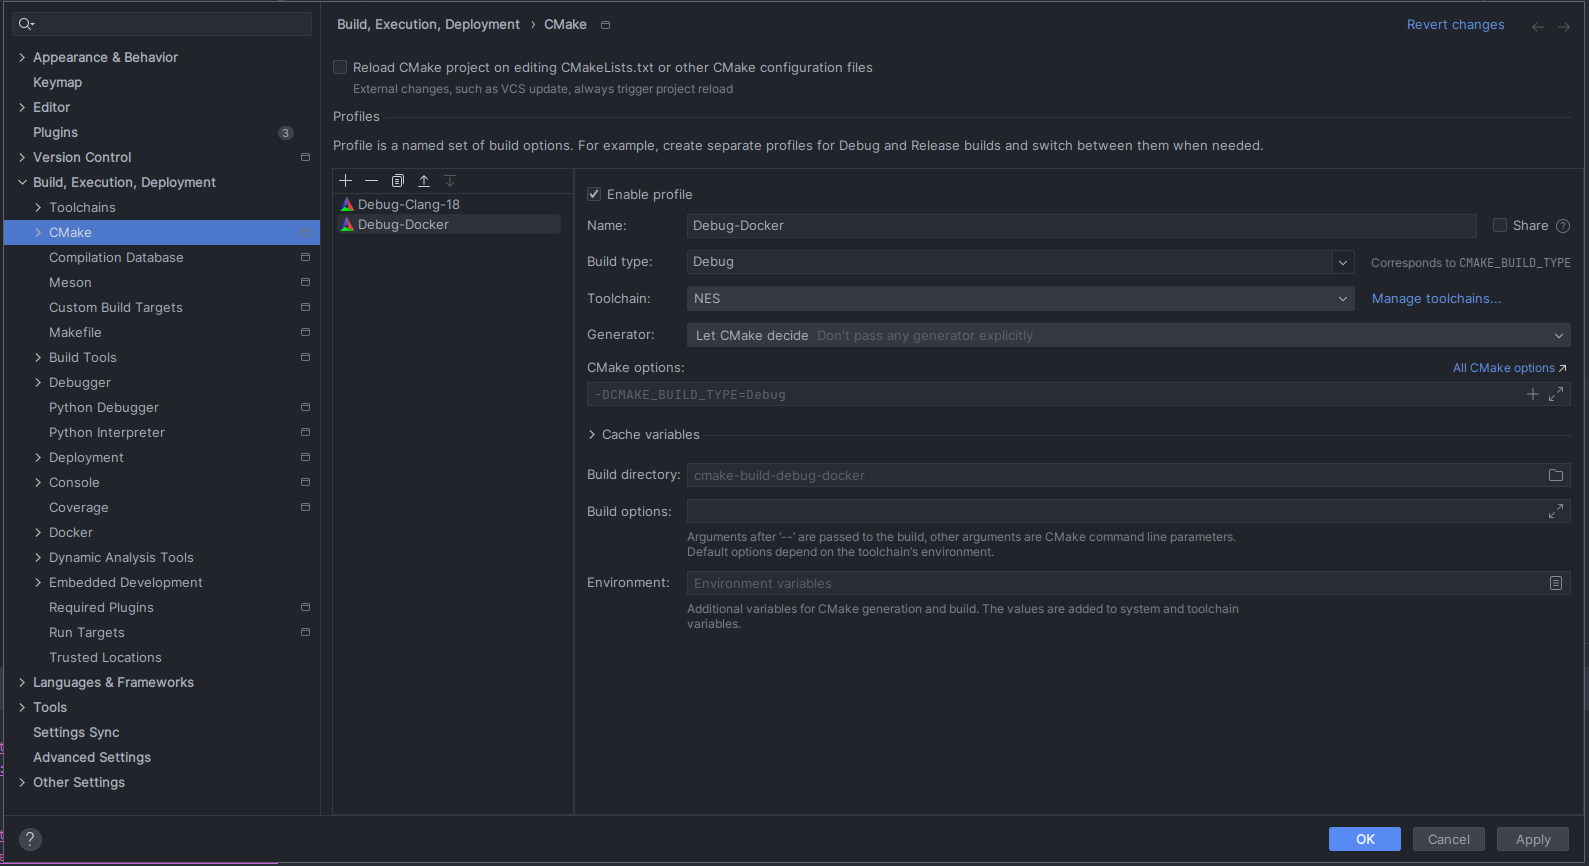
Lastly, you need to create a new CMake profile which uses the newly created docker-based toolchain:
Non-Container Development Environment
The relevant CI Jobs will be executed in the development container. This means in order to reproduce CI results, it is essential to replicate the development environment built into the base docker image. Note that NebulaStream uses llvm for its query compilation, which will take a while to build locally. You can follow the instructions of the instructions of the base.dockerfile to replicate on Ubuntu or Debian systems.
The compiler toolchain is based on llvm-22 and libc++-22, and we use the mold linker for its better performance.
Follow the llvm documentation to install a recent toolchain via your package manager.
Local VCPKG with DCMAKE_TOOLCHAIN_FILE
A local vcpkg repository should be created, which could be shared between different projects. To instruct the CMake build to use a local vcpkg repository, pass the vcpkg CMake toolchain file to the CMake configuration command.
cmake -B build -DCMAKE_TOOLCHAIN_FILE=/home/user/vcpkg/scripts/buildsystems/vcpkg.cmake
The first time building NebulaStream, VCPKG will build all dependencies specified in the vcpkg/vcpkg.json manifest, subsequent builds can rely on the VCPKGs internal caching mechanisms even if you delete the build folder.
To set the CMake configuration via CLion you have to add them to your CMake profile which can be found in the CMake settings.
Local VCPKG without DCMAKE_TOOLCHAIN_FILE
If you omit the toolchain file, the CMake system will create a local vcpkg-repository inside the project directory
and pursue building the dependencies in there. If you later wish to migrate the vcpkg-repository you can move it
elsewhere on your system and specify the -DCMAKE_TOOLCHAIN_FILE flag.
Using a local installation of MLIR
Building LLVM and MLIR locally can be both time and disk-space consuming. The cmake option -DUSE_LOCAL_MLIR=ON will
remove the vcpkg feature responsible for building MLIR. CMake then expects to be able to locate MLIR somewhere on
the system.
The current recommendation is to use the
legacy pre-built llvm archive
and pass the -DCMAKE_PREFIX_PATH=/path/to/nes-clang-18-ubuntu-22.04-X64/clang
cmake -B build \
-DCMAKE_TOOLCHAIN_FILE=/path/to/vcpkg/scripts/buildsystems/vcpkg.cmake \
-DUSE_LOCAL_MLIR=ON \
-DCMAKE_PREFIX_PATH=/path/to/nes-clang-18-libc++-x64-None/clang
Ensure your locally installed version of MLIR uses the correct standard library and sanitizers. The default build uses libc++ and no sanitizers. Mismatches between the standard library will appear as linker errors during the build, while mismatched sanitizers might cause them not to work or produce false positives.
Standard Libraries
In its current state, NebulaStream supports both libstdc++ and libc++. Both libraries offer compelling reasons to use one over the other. For local debugging, CLion offers custom type renderers for stl types (e.g., vector and maps). Libc++ frees us from being tied to a hard-to-change libstdc++ distributed with GCC. Additionally, libc++ enables the use of a hardened library version.
Effectively using both libraries makes NebulaStream more robust by enabling tooling for both libraries. This flexibility means we are not locked into a specific standard library, allowing us to take advantage of tools and debugging features for both libstdc++ and libc++. It also reduces the likelihood of encountering undefined behavior or implementation-specific details, which can complicate development and hinder portability. By leveraging both libraries, we improve the potential for porting NebulaStream to smaller embedded IoT devices.
However, using both libraries comes with trade-offs. It limits us to the intersection of the features and behavior supported by both libraries. Additionally, the CI ensures that code compiles and runs successfully with libstdc++ and libc++ to maintain this dual compatibility.
Compiling with Libstdc++
By default, NebulaStream attempts to build with libc++ if it is available on the host system (which is the case for all
docker images).
Using the cmake flag -DUSE_LIBCXX_IF_AVAILABLE=OFF disables the check and fallback to the default standard library on
the system.
If you intend to use the docker image with libstdc++ you can get the development image by pulling
[!NOTE] We do not provide libstdc++ images for ARM at the moment.
docker pull nebulastream/nes-development:latest-libstdcxx
Building with Nix and NixOS
NebulaStream provides Nix support for reproducible builds and development environments.
Building with Nix
The project includes a flake.nix for declarative development environments and helper scripts in the .nix/ directory
that wrap build tools to run inside the Nix development shell.
Setting up the Nix environment
Configure the project using the Nix-wrapped CMake:
./.nix/nix-cmake.sh \
  -DCMAKE_BUILD_TYPE=Debug \
  -G Ninja \
  -S . -B cmake-build-debug
The wrapper automatically re-enters
nix develop, selects the LLVM toolchain supplied by the flake, and forwards the default CMake flags (e.g.,NES_USE_SYSTEM_DEPS=ON) so no vcpkg toolchain file is required.Build the project using the Nix-wrapped CMake driver:
./.nix/nix-cmake.sh --build cmake-build-debugRun the clang-tidy diff workflow against
origin/main:nix run .#clang-tidyPass another base ref after
--to compare against a different branch or commit, for examplenix run .#clang-tidy -- upstream/main. The command uses the officialclang-tidy-diff.pyworkflow, applies fixes in place, and configures and buildsbuild/.
CLion Integration with Nix
To use the Nix development environment with CLion:
Install Nix (with flakes enabled): Follow the official Nix installation instructions and open a shell with access to the
nixcommand. The following commands rely on Nix flakes, so either enable them globally by addingexperimental-features = nix-command flakesto~/.config/nix/nix.conf, or prefix the commands withnix --extra-experimental-features 'nix-command flakes' .... nix commands should not need sudo rights. If they do make sure the nix damon is running in the background.Generate tool shims: Run the helper bundled in the flake to create the required symlinks in
.nix/:nix run .#clion-setupThis produces
.nix/cc,.nix/c++,.nix/clang,.nix/clang++,.nix/ctest, and.nix/ninja, each pointing tonix-run.shso every invocation re-enters the Nix development shell with the correct toolchain.Configure a custom toolchain in CLion:
- Go to Settings → Build, Execution, Deployment → Toolchains
- Add a new toolchain and set:
- C Compiler:
/path/to/project/.nix/cc - C++ Compiler:
/path/to/project/.nix/c++ - CMake:
/path/to/project/.nix/nix-cmake.sh - CTest:
/path/to/project/.nix/ctest - Make/Ninja:
/path/to/project/.nix/ninja - Debugger:
/path/to/project/.nix/gdb
- C Compiler:
Set up the CMake profile:
- Go to Settings → Build, Execution, Deployment → CMake
- Create a new profile with the Nix toolchain created above
- You might need to set ´NES_USE_SYSTEM_DEPS=1´ in the cmake flags in specific setups