 NebulaStream Docs
NebulaStream uses a layered testing strategy. Each layer has a defined scope, and layers complement rather than replace each other. A unit test verifying component logic and a systest verifying end-to-end correctness are not interchangeable, so pick the layers your change actually needs rather than defaulting to one.
Test Types at a Glance
| Type | Scope | Required when adding | CI cadence |
|---|---|---|---|
| Unit test | One component in isolation, no engine | Logic a SQL query cannot reach precisely | Every PR |
| System-level test | Full query pipeline, single node | Operators, functions, formatters | Every PR |
| Connector test | A connector against an external service, no engine | New source or sink plugin | Subset per PR, full nightly/weekly |
| Distributed test | Multi-node topology | Distributed routing or failure scenarios | Subset per PR, chaos nightly/weekly |
Unit Tests
Unit tests exercise a single component in isolation.
Write a unit test when the component has algorithmic logic that a query cannot reach precisely — input combinations, edge cases, error paths. Be on point and keep the number of tests as sensible as possible while not overdoing it.
Skip a unit test for pure glue code — registration forwarding, trivial descriptor construction, wiring with no logic of its own. These are better verified at the systest level.
Property-based testing. For data-structure-heavy or algorithmic components, we prefer property-based tests over hand-picked cases.
Instead of enumerating inputs, we state an invariant and let RapidCheck generate and shrink randomized inputs via the RC_GTEST_PROP macro.
For example, the PagedVector and ChainedHashMap redesigns follow this approach.
Build with -DNES_EXHAUSTIVE_TESTS=ON for more iterations, and see nes-nautilus/tests/UnitTests/PagedVectorTest.cpp for a reference.
All unit tests extend BaseUnitTest and use Google Test / Google Mock:
#include <BaseUnitTest.hpp>
#include <gtest/gtest.h>

class MyComponentTest : public Testing::BaseUnitTest
{
  public:
    void SetUp() override { BaseUnitTest::SetUp(); }
};

TEST_F(MyComponentTest, handlesEdgeCase)
{
    /// ...
}
- Place tests under
{module}/tests/UnitTests/and register them in the module’sCMakeLists.txt. - Shared utilities live in
nes-common/tests/Util/include/. Link againstnes-test-util.
System-Level Tests (Systests)
Systests exercise the full query pipeline on a single embedded node: SQL parsing → logical plan → optimization → execution → result validation. They are the primary correctness layer for the query engine.
Always write a systest when adding an operator, SQL function, or formatter. The systest proves the component is reachable via a real SQL query and produces correct output. Sources and sinks are the exception: their correctness against an external service is the job of the connector tests, not of a systest.
Prefer a systest over a unit test whenever a SQL query can reach the behaviour you want to pin down. It exercises the component the way a user does, and it survives refactorings of the internals. Reach for a unit test only where a query cannot express the case precisely enough.
For file syntax, groups, in-test worker configuration, validation modes, and how to run them, see How to Systest below.
Connector Tests
Connector tests verify the correctness of a source or sink plugin without the engine. Beyond expected-vs-actual data correctness, they cover reconnects, buffer loss under a given configuration, and valid/invalid configs, by scripting scenarios against an external service and injecting faults between it and NebulaStream.
Link the connector test documentation (nes-conn-test/README.md) here once it lands.
Distributed Tests
Distributed tests verify multi-node query execution — routing, operator placement, and fault handling. They use the forthcoming Python framework for orchestration.
- Per PR: deterministic tests with a fixed topology, fixed placement, and fixed scenarios.
- Nightly / weekly: chaos tests — random topologies, random worker capacity, fault injection (poison pills, network partitions). These surface non-deterministic failure modes that deterministic tests miss.
Neither layer exists yet. Chaos testing in particular has no counterpart in the codebase today — the row above describes the target, not the status quo.
When Tests Run
| Test type | Per PR | Nightly | Weekly |
|---|---|---|---|
| Unit tests | ✓ all | ✓ | — |
| System-level tests (standard groups) | ✓ all | ✓ | — |
| System-level tests (large groups) | — | ✓ | — |
| Connector tests | ✓ subset | ✓ full | ✓ full |
| Distributed tests (deterministic) | ✓ subset | ✓ | — |
| Distributed tests (chaos) | — | ✓ | ✓ |
The last two rows are the plan, not the current state — see above.
Examples
Cover every layer that applies, and only those.
| Contribution | Unit test | Systest | Connector test |
|---|---|---|---|
| SQL function | Yes — cover both interpreter and compiled path | Yes | — |
| Operator | Yes | Yes | — |
| Optimizer rule | Yes — enumerate each rule-triggering case | No — optimization is not user-observable | — |
| Input / output formatter | Yes | Yes | — |
| Source plugin | Yes | No — connector tests cover it | Yes — opt into applicable scenarios |
| Sink plugin | Yes | No — connector tests cover it | Yes — opt into applicable scenarios |
How to Systest
Requirements
This document assumes that you already have a working development setup for the nebulastream repository, as described in Build instructions.
Setup
- To set up the syntax highlighting in CLion, follow the Syntax Highlighting Documentation.
- To set up the Clion plugin for manually executing systests, follow the Systest Plugin Documentation.
Write tests
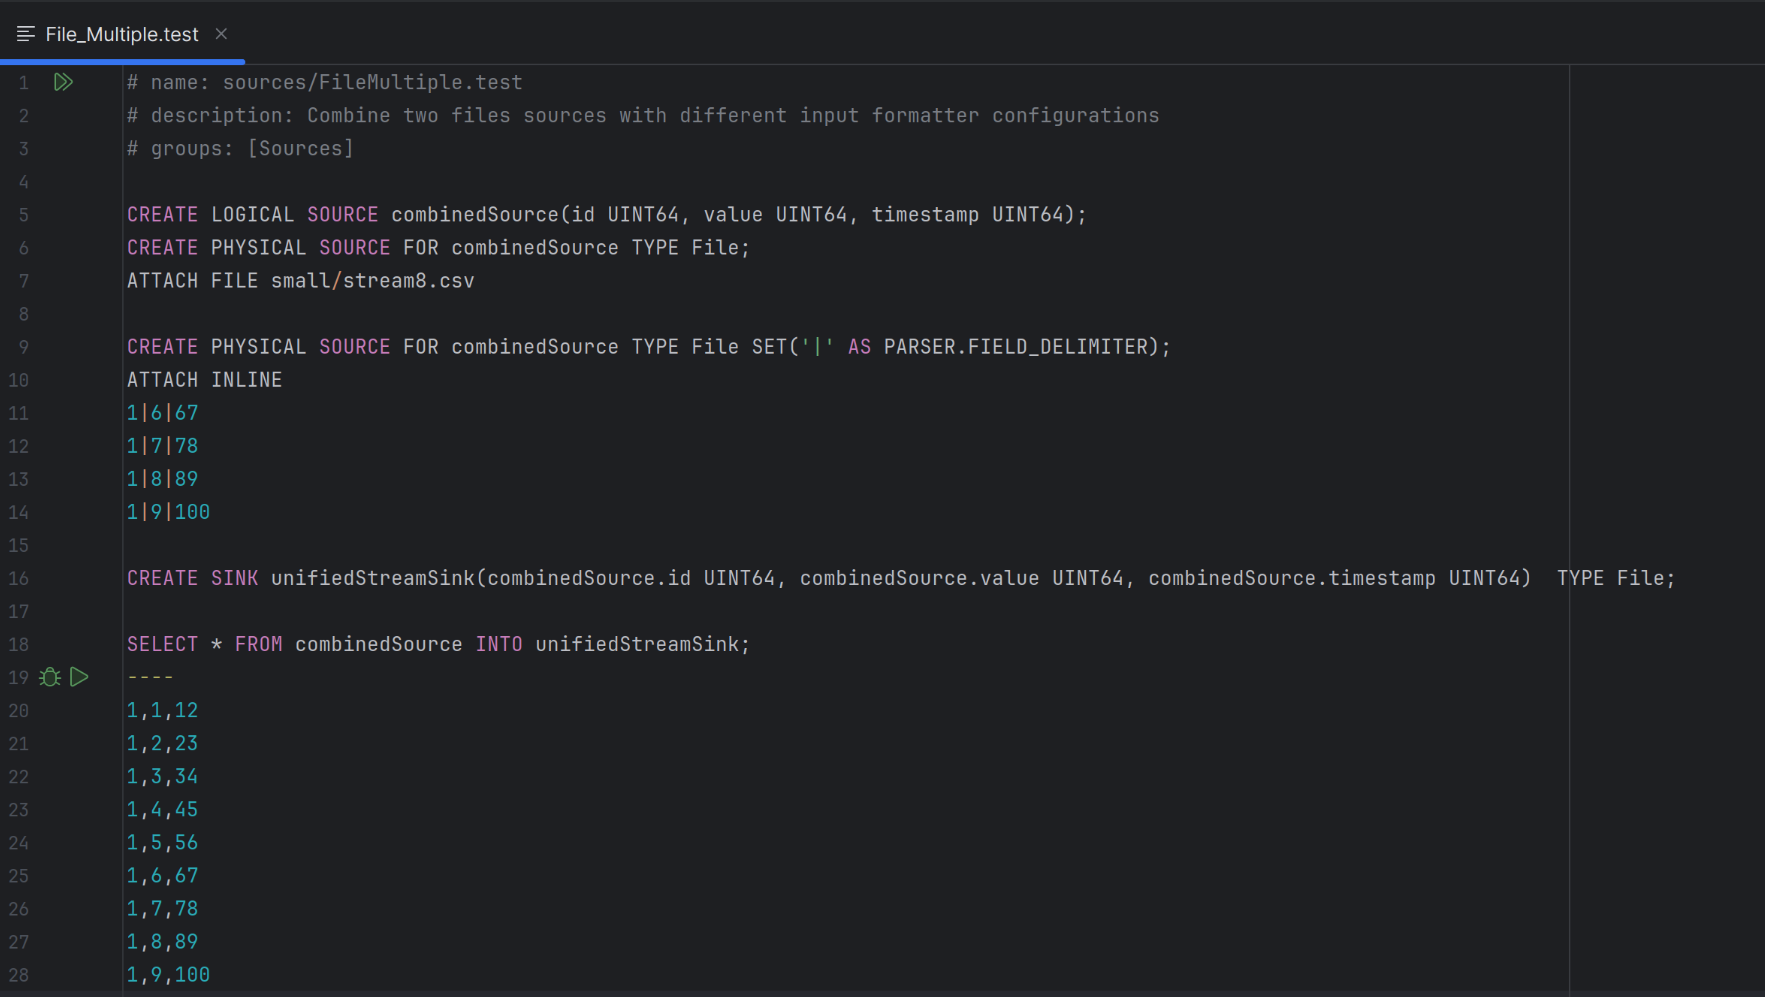
All tests are written in custom test files of type .test.
These test files contain meta information about the test suite, define all required sinks and sources, provide, if necessary, the test input data, and define the actual test cases.
You can see an example test file at the top of this page.
The file begins with a brief documentation, followed by the definition of sources, sinks, and test cases via SQL statements.
Following, the individual parts are described.
Please refer to the existing .test files for additional examples.
Comments
Lines that start with a hashtag (#) are comments and are mostly ignored by the systest. The only exception is the documentation prefix at the beginning of the file.
Documentation Prefix
Each test file starts with three lines with the following pattern:
# name: sources/FileMultiple.test
# description: Combine two files sources with different input formatter configurations
# groups: [Sources, Example]
All lines start with a hashtag indicating a Comment.
The first line (starting with # name:) defines the name of the test suite, usually the relative path to the file from within the nes-systests folder.
The second line (starting with # description:) is a text that describes what the given test suite tests.
The third line (starting with # groups:) lists in brackets groups to which the given test suite belongs, such as “Sources”, “Aggregation”, or “Union”.
Groups are used to select all test cases from this group for testing, or exclude test cases from within this group when executing all other tests.
In-Test Worker Configuration
A test file can override worker configuration via GlobalConfiguration.
Listing multiple values runs every query of the file once per value:
GlobalConfiguration worker.default_query_execution.operator_buffer_size: [4096, 8192]
The example above executes the whole file twice, once with each buffer size.
Any worker configuration option can be set this way.
The available options are numerous and change over time, so we do not enumerate them here.
For the full set of keys, defaults, and accepted values, e.g., default_query_optimization.join_strategy (HASH_JOIN or NESTED_LOOP_JOIN), see the worker configuration definitions starting at nes-runtime/interface/Configuration/WorkerConfiguration.hpp.
Sources
Sources are created via SQL statements. These statements may be written across multiple lines, but must be concluded with a semicolon or a trailing empty line. You need to define logical and physical sources.
Logical sources define their schema, but no data input. A query to create a logical source can look like the following:
CREATE LOGICAL SOURCE input(id UINT64, data FLOAT64);.
Physical sources define concrete data inputs for logical sources.
These can be of different types, such as file sources, TCP sources, or generator sources.
Identical to the NES repl parser, you can optionally define parameters for the physical source.
You can provide input data for the physical source inline (via the ATTACH INLINE statement directly following the physical source definition), or using a file that lies in nes-systests/testdata/ (via the ATTACH FILE [path] statement directly following the physical source definition).
For both methods, whitespace in the tuples is not trimmed.
Examples:
# A plain file source with inline data
CREATE PHYSICAL SOURCE FOR input TYPE File;
ATTACH INLINE
1,1.5
2,2.5
3,3.5

# A file source with a non-standard field delimiter and inline data
CREATE PHYSICAL SOURCE FOR input TYPE File SET('|' AS INPUT_FORMATTER.FIELD_DELIMITER);
ATTACH INLINE
1|1.5
2|2.5
3|3.5

# A plain file source with input data provided by a test file
CREATE PHYSICAL SOURCE FOR input TYPE File;
ATTACH FILE testdata.csv

# A generator source with no additional input data because it generates its data automatically.
CREATE PHYSICAL SOURCE FOR input TYPE Generator SET(
       'ONE' as "SOURCE".STOP_GENERATOR_WHEN_SEQUENCE_FINISHES,
       1 AS "SOURCE".SEED,
# Avoid using timeouts for the generator sources, it can cause flakey tests.
#      1000000 AS "SOURCE".MAX_RUNTIME_MS,
# Instead rely on self-terminating sequences
       'SEQUENCE UINT64 0 100 1, SEQUENCE FLOAT64 0 200 1' AS "SOURCE".GENERATOR_SCHEMA
);
Anonymous Sources
Additionally, a source can be defined inline within a SQL query.
Instead of naming a source, you can create an anonymous source by writing [TYPE]([OPTIONS]) (cmp. the example below).
The accepted options are mostly the same as when creating a source via a CREATE SOURCE statement.
The only difference is that a schema must be given via the options SOURCE.SCHEMA using the SCHEMA function.
You cannot use the ATTACH statement to pipe a file or inline data into the source.
To use a file input, use the SOURCE.FILE_PATH option. If no absolute path is given, the systest framework assumes
the test data directory of the systest as the root directory.
Example:
SELECT ID, VALUE, TIMESTAMP
FROM File(
	'small/stream8.csv' AS "SOURCE".FILE_PATH,
	'CSV' AS INPUT_FORMATTER."TYPE",
	SCHEMA(id UINT64, value UINT64, timestamp UINT64) AS "SOURCE"."SCHEMA")
INTO output;
Sinks
Sinks are also defined via SQL statements, can be written over multiple lines, and must be concluded with a semicolon or a trailing empty line. When creating a sink, the exact expected schema and the type of the sink must be provided.
Examples:
CREATE SINK output(id UINT64, data FLOAT64) TYPE File;

CREATE SINK output2(id UINT64) TYPE File;

CREATE SINK output3(new_column UINT64) TYPE Checksum;
Anonymous Sinks
Additionally, sinks can be defined inline within a SQL query.
Instead of naming the sink, you can create the anonymous sink by writing [TYPE]([options]) (cmp. example below).
The accepted options are mostly the same as when creating a sink via a CREATE SINK statement.
The only difference is that a schema CAN OPTIONALLY be given via the options SINK.SCHEMA using the SCHEMA function.
If no schema is given, the schema is inferred automatically.
Anonymous sinks are also able to configure the output formatter via OUTPUT_FORMATTER.* parameters.
Because the systest framework automatically sets the sink file paths, File and Generator sinks can be created
without any options.
Examples:
SELECT ID, VALUE, TIMESTAMP
FROM input_source
INTO File();

SELECT ID, VALUE, TIMESTAMP
FROM input_source
INTO File(SCHEMA(ID UINT64, VALUE VARSIZED, TIMESTAMP UINT64) AS "SINK"."SCHEMA", FALSE AS "OUTPUT_FORMATTER".QUOTE_STRINGS);

SELECT ID, VALUE, TIMESTAMP
FROM input_source
INTO Checksum();
Test Cases
The test cases consist of SQL statements executed by NebulaStream, along with the expected results.
The expected results can either be provided inline (separated from the test query via ----) or via another SQL statement that is executed by NebulaStream (separated from the test query via ====).
The provided inline data can be either the expected tabular results, or the expected error code.
Examples:
SELECT input.id, input.data
FROM input
INTO output1
----
1,1.5
2,2.5
3,3.5

SELECT invalid_field
FROM input
INTO output;
----
ERROR 2003

SELECT input.id * 1, input.data * 1
FROM input
INTO output1
====
SELECT input.id / 1, input.data / 1
FROM input
INTO output1;
EXPLAIN Result Matching
An EXPLAIN test can compare the complete normalized plan verbatim:
EXPLAIN (LOGICAL) FORMAT TEXT
SELECT id FROM input INTO File();
----
== Initial Logical Plan ==
SINK(FILE)
  PROJECTION(fields: [ID])
    SOURCE(INPUT)
==END==
Without regex tags, expected and actual output must have the same lines in the same order. Trailing whitespace and empty lines are ignored.
Alternatively, the expected block can contain positive and negative regex assertions. Each assertion uses std::regex_search against the complete normalized EXPLAIN output:
EXPLAIN (OPTIMIZED) FORMAT TEXT
SELECT id FROM input INTO File();
----
<REGEX>PROJECTION\(fields: \[ID\]\)</REGEX>
<!REGEX>TIMESTAMP</!REGEX>
<REGEX>...</REGEX> requires a match, while <!REGEX>...</!REGEX> requires that no match exists. Multiple assertions are evaluated independently.
Assertions can also span multiple lines. The opening and closing tags must then be on separate lines, and the complete body is interpreted as one newline-preserving regex:
<REGEX>
SINK\(FILE\)
[\s\S]*SOURCE\(INPUT\)
</REGEX>
Inline assertions must occupy one complete line. A single expected-result block must use either verbatim matching or tagged regex assertions; the two modes cannot be mixed. Empty, nested, mismatched, or unclosed regex tags are rejected.
Run tests
Via Plugin
The easiest way to run systest is the CLion Plugin.
When you have installed the plugin and open a systest file (with the ending .test), you see green bugs and triangles next to the test queries, and a double triangle next to very first line.
If you click the green arrow next to a test query, that specific test is automatically run, and the results are shown in a window pane below.
Clicking the green bug works similarly, but starts the query in debug mode. In debug mode, the system will pause at all breakpoints.
Alternatively, you can click the double triangle in the first line to run all test queries in the selected file.
Systest Executable
You can also run the systest via the CMake systest executable either in the terminal or via your IDE such as CLion.
The executable can run individual tests, all tests in a given file, or all test files that belong to a defined group.
You can select the test cases and define the behaviour via command line arguments.
The executable can run individual tests (-t /path/to/test.test:1), all tests in a given file (-t /path/to/test.test), or all test files that belong to a defined group (-g group1 group2, -e excludedGroup).
Tests can be run with specific configuration settings (-- --worker.total_memory_in_bytes=81920000).
Permanent exclusions can be configured via --disableConfigFile (defaulting to ${TEST_CONFIGURATION_DIR}/systest-disable.yaml) and can be ignored per run with --ignoreDisableConfigFile. The disable config file understands exclude_groups and disabled_test_files.
To measure the execution time of tests use the benchmark mode (-b).
To send queries to remote workers, use remote mode (-r or --remote).
The endless mode runs tests in an infinite loop i.e. for regression testing (--endless).
To show all currently supported command line arguments, execute the systest executable with the --help flag.
Topologies
The systest framework supports configurable multi-worker topologies. By default, it uses the 2-node topology.
Specifying a Topology
Use the --clusterConfig flag to specify a different topology configuration:
systest --clusterConfig /path/to/config/single-node.yaml
Topology Configuration Format
Topology files are YAML documents that define the worker network structure and source/sink placement policies.
Example: Two-Node Topology
workers:
  - host: "sink-node:8080"
    data_address: "sink-node:9090"
    max_operators: 10000
  - host: "source-node:8080"
    data_address: "source-node:9090"
    max_operators: 100
    downstream:
      - "sink-node:8080"

allow_source_placement:
  - "source-node:8080"

allow_sink_placement:
  - "sink-node:8080"
  - "source-node:8080"
Configuration Fields:
| Field | Description |
|---|---|
workers[].host | Worker gRPC control-plane address and worker identity (format: hostname:port) |
workers[].data_address | Worker data-plane address (format: hostname:port) |
workers[].max_operators | Maximum concurrent operator slots on this worker (integer or Unlimited) |
workers[].downstream | Optional list of downstream workers for data routing |
allow_source_placement | Workers eligible for source placement (defaults to all workers if omitted) |
allow_sink_placement | Workers eligible for sink placement (defaults to all workers if omitted) |
Automatic Source/Sink Placement
To keep tests portable across topologies, the systest framework automatically assigns physical sources and sinks to workers based on the topology configuration.
Placement Strategy:
- Sources are placed on workers listed in
allow_source_placement - Sinks are placed on workers listed in
allow_sink_placement
This allows tests to be topology-agnostic and run on both single-node and distributed configurations without modification.
Explicit Worker Assignment
Named physical sources and sinks support explicit placement via SOURCE.HOST and SINK.HOST. Anonymous sources support SOURCE.HOST; anonymous sinks use topology-based sink placement, so use a named sink when a sink must be pinned to a specific worker.
Named Sources and Sinks:
CREATE LOGICAL SOURCE nameStream(firstName VARSIZED, lastName VARSIZED);

CREATE PHYSICAL SOURCE FOR nameStream
TYPE File
SET('source-node:8080' AS "SOURCE"."HOST");
ATTACH INLINE
Alice,Smith
Bob,Jones

CREATE SINK firstNameLastNameSink(firstNameLastName VARSIZED)
TYPE File
SET('sink-node:8080' AS "SINK"."HOST");

SELECT CONCAT(firstName, lastName) AS firstNameLastName
FROM nameStream
INTO firstNameLastNameSink;
----
AliceSmith
BobJones
Anonymous Sources with Automatically Placed Anonymous Sinks:
SELECT id, value, timestamp
FROM File(
    'small/stream8.csv' AS "SOURCE".FILE_PATH,
    'source-node:8080' AS "SOURCE"."HOST",
    'CSV' AS INPUT_FORMATTER."TYPE",
    SCHEMA(id UINT64, value UINT64, timestamp UINT64) AS "SOURCE"."SCHEMA")
INTO File(
    'CSV' AS "SINK".OUTPUT_FORMAT);
----
1,1,12
1,2,23
1,3,34
1,4,45
1,5,56
[!NOTE] Explicit worker assignment overrides the automatic placement strategy. Use this for tests that specifically validate distributed query execution or data routing.
Remote Tests
By default, systest runs all workers embedded within a single process, using in-memory communication channels for multi-worker topologies. Compared to remote tests with real network overhead, this provides faster test execution and simplified debugging.
Running Against Remote Workers
To test against actual distributed workers, use the --remote flag. The systest framework will connect to workers at the gRPC addresses specified in the topology configuration.
Example: Single Remote Worker
# Terminal 1: Start a worker
cmake-build-debug/nes-single-node-worker/nes-single-node-worker --grpc=localhost:8080 --data_address=localhost:9090

# Terminal 2: Run systest against the remote worker
cmake-build-debug/nes-systests/systest/systest \
    --clusterConfig nes-systests/configs/topologies/single-node.yaml \
    --remote
[!NOTE] When using remote mode, ensure:
- All workers are reachable at the addresses specified in the topology config
- Workers are started with the correct
--grpcaddresses- Network connectivity exists between systest and all workers
- If using Docker, workers must be in the same network or properly exposed
Docker-Based Remote Testing
For complex multi-worker topologies, use Docker Compose to orchestrate the cluster. The distributed remote test demonstrates this approach:
- The test generates a
docker-compose.yamlfrom the topology configuration - Docker Compose starts all workers in containers
- Systest runs in remote mode against the containerized cluster
- Cleanup happens automatically after test completion
Requirements:
- Enable Docker tests during build:
-DENABLE_DOCKER_TESTS=ON - Docker and Docker Compose must be installed
- Sufficient system resources for multiple worker containers
Example Test Invocation:
# Build with Docker support
cmake -B build -DENABLE_DOCKER_TESTS=ON
cmake --build build

# Run Docker-based remote tests
cd build
ctest -R systest-remote-test -V
The Docker approach provides the most realistic testing environment for distributed deployments, validating network communication, serialization, and multi-node query execution.
[!NOTE] If you are using a Docker-based development environment, you must provide access to the Docker daemon (e.g., by mounting the Docker socket). Otherwise, Docker-based tests are disabled.