 NebulaStream Docs
Quick Start
Install NebulaStream
The recommended way to run NebulaStream is with Docker. A basic setup consists of two components: a NebulaStream worker, which executes the queries, and a NebulaStream client, which is used to submit queries to the worker.
Run a NebulaStream Worker
Open a terminal and run the following Docker command to start a NebulaStream worker:
docker run -d --rm \
  --name worker \
  -v "$PWD/output:/output" \
  nebulastream/nes-worker \
  -- --grpc=0.0.0.0:8080
This command starts a NebulaStream worker in a Docker container and exposes its gRPC port on all network interfaces at 0.0.0.0:8080.
Check with docker ps if the worker is running.
Expected Output
CONTAINER ID   IMAGE                      COMMAND                  CREATED              STATUS              PORTS     NAMES
522ba7470f73   nebulastream/nes-worker   "nes-single-node-wor…"   About a minute ago   Up About a minute             worker
Note that the container ID can be different.
Run Your First Query
We will use the NebulaStream CLI to submit a query to the running worker. To do this, the CLI requires a topology file, which defines the query configuration and deployment topology.
Create a file called topology.yaml and paste the following content:
query: |
  SELECT VALUE * UINT64(2) AS SCALED_VALUE
  FROM GENERATOR_SOURCE
  INTO RESULTS

sinks:
  - name: RESULTS
    host: localhost:8080
    schema:
      - name: SCALED_VALUE
        type: UINT64
    type: File
    config:
      output_format: CSV
      file_path: /output/results.csv
      append: false

logical:
  - name: GENERATOR_SOURCE
    schema:
      - name: VALUE
        type: UINT64

physical:
  - logical: GENERATOR_SOURCE
    host: localhost:8080
    parser_config:
      type: CSV
      field_delimiter: ","
    type: Generator
    source_config:
      generator_rate_type: FIXED
      generator_rate_config: emit_rate 25
      stop_generator_when_sequence_finishes: ALL
      seed: 5
      generator_schema: |
        SEQUENCE UINT64 0 250 1

workers:
  - host: localhost:8080
    data_address: localhost:9090
    max_operators: 10000
What Does This Query Do?
This topology file describes a query to be executed on a single-node worker.
The query reads records from GENERATOR_SOURCE, uses the field VALUE, multiplies it by 2, and writes the result as a new field called SCALED_VALUE into RESULTS, which is /output/results.csv.
Check the topology file format for further details on how to structure a topology file.
Submit the Query
Run the query using the following command:
  docker run --rm \
    --network container:worker \
    -v "$PWD/topology.yaml:/catalog/topology.yaml:ro" \
    nebulastream/nes-cli \
    -t /catalog/topology.yaml start
If query registration is successful, CLI returns the query ID and stops.
Example Output of a Query Submission
soaring_thoroughbred_0926
Check the output
After a few seconds, inspect the output:
head output/results.csv
The first rows should look like this:
SCALED_VALUE:UINT64:NOT_NULLABLE
0
2
4
6
8
10
12
14
16
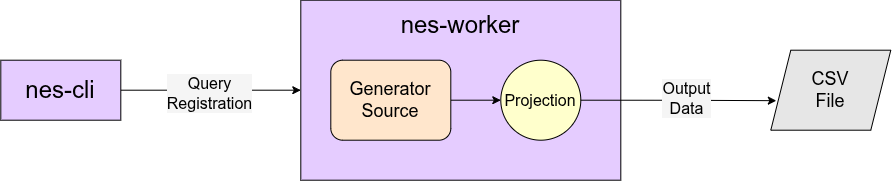
What Happened?
We registered a query via nes-cli.
Generator source inside the NebulaStream worker started generating data and sent it to the execution engine for processing.
Results were outputted to a CSV file after processing.
Stop the Worker
Then you can stop the worker with the following command:
docker stop worker
Use Docker Compose
You can also use Docker Compose to orchestrate the setup.
First, create a compose.yaml:
services:
  worker:
    image: nebulastream/nes-worker
    volumes:
      - ./output:/output
    command: ["--", "--grpc=0.0.0.0:8080"]
    tty: true
    stdin_open: true

  nes-cli:
    image: nebulastream/nes-cli
    depends_on:
      - worker
    volumes:
      - .:/catalog
    entrypoint: ["/bin/sh", "-c"]
    command: ["tail -f /dev/null"]
The compose file above keeps the nes-cli alive, so that we can check the query status, and also stop the query later.
Create New Topology File
Create a new topology file by using the command below.
It uses the existing topology file to create a new one (compose-topology.yaml) by replacing the host address, so that the client can access the worker.
sed 's/localhost/worker/g' topology.yaml > compose-topology.yaml
Run the Setup
Run the docker compose file using the following command:
docker compose up -d
This runs the worker and the nes-cli instances.
Expected Output
[+] up 3/3
 ✔ Network nes-first-query_default       Created
 ✔ Container nes-first-query-worker-1    Started
 ✔ Container nes-first-query-nes-cli-1   Started
Check that both containers are running:
docker compose ps
Expected Output
CONTAINER ID   IMAGE                       COMMAND                  CREATED         STATUS         PORTS     NAMES
5cf4354e7f2c   nebulastream/nes-cli   "/bin/sh -c 'tail -f…"   2 seconds ago   Up 2 seconds             nes-first-query-nes-cli-1
365d32e83391   nebulastream/nes-worker    "nes-single-node-wor…"   3 seconds ago   Up 2 seconds             nes-first-query-nes-worker-1
Submit the Query
Run the following command to submit the query via nes-cli:
docker compose exec -T nes-cli nes-cli -t /catalog/compose-topology.yaml start
The command prints a query ID. Seeing the query ID in the output means the query registration is successful, and the query is running. Keep the query ID for status check or stopping the query later.
Example Output of a Query Submission
regal_hanoverian_9516
Check Status of the Query
If you kept the query ID, check its status by replacing it with the <query-id> below:
docker compose exec -T nes-cli nes-cli -t /catalog/compose-topology.yaml status <query-id>
This should return the status of the registered query.
Example Output of Query Status Check
The status check first returns the query’s global status, followed by its status on each worker where it is running. In this single-node example, the output therefore includes the global status and the status reported by the single worker.
The status output contains the following fields:
query_id: Identifies the query as a whole and is shared by its global and worker-local status entries.local_query_id: A UUID assigned by a worker to its local query instance. It appears only in worker-local entries.worker: The address of the worker running the local query instance.query_status: The current state of the query, such asRunningorStopped.started: The time at which the query was started.running: The time at which the query entered theRunningstate.stopped: The time at which the query entered theStoppedstate.
Each timestamp contains:
formatted: A human-readable representation of the timestamp.since_epoch: The time elapsed since the Unix epoch (1970-01-01 00:00:00 UTC).unit: The unit used bysince_epoch, currentlymicroseconds.
[
    {
        "query_id": "regal_hanoverian_9516",
        "query_status": "Running",
        "running": {
            "formatted": "2026-07-31 13:32:34.339000",
            "since_epoch": 1785504754339000,
            "unit": "microseconds"
        },
        "started": {
            "formatted": "2026-07-31 13:32:34.293000",
            "since_epoch": 1785504754293000,
            "unit": "microseconds"
        }
    },
    {
        "local_query_id": "656d2d78-496d-4409-89c3-caa8789c9297",
        "query_id": "regal_hanoverian_9516",
        "query_status": "Running",
        "running": {
            "formatted": "2026-07-31 13:32:34.339000",
            "since_epoch": 1785504754339000,
            "unit": "microseconds"
        },
        "started": {
            "formatted": "2026-07-31 13:32:34.293000",
            "since_epoch": 1785504754293000,
            "unit": "microseconds"
        },
        "worker": "worker:8080"
    }
]
Stop the Query
Stop the query using nes-cli:
docker compose exec -T nes-cli nes-cli -t /catalog/compose-topology.yaml stop <query-id>
Example Output of a Query Stop Command
[
    {
        "query_id": "regal_hanoverian_9516"
    }
]
And check the status again:
docker compose exec -T nes-cli nes-cli -t /catalog/compose-topology.yaml status <query-id>
This should return the status of the registered query as Stopped.
Expected Output
[
    {
        "query_id": "regal_hanoverian_9516",
        "query_status": "Stopped",
        "running": {
            "formatted": "2026-07-31 13:32:34.339000",
            "since_epoch": 1785504754339000,
            "unit": "microseconds"
        },
        "started": {
            "formatted": "2026-07-31 13:32:34.293000",
            "since_epoch": 1785504754293000,
            "unit": "microseconds"
        },
        "stopped": {
            "formatted": "2026-07-31 13:32:44.557000",
            "since_epoch": 1785504764557000,
            "unit": "microseconds"
        }
    },
    {
        "local_query_id": "656d2d78-496d-4409-89c3-caa8789c9297",
        "query_id": "regal_hanoverian_9516",
        "query_status": "Stopped",
        "running": {
            "formatted": "2026-07-31 13:32:34.339000",
            "since_epoch": 1785504754339000,
            "unit": "microseconds"
        },
        "started": {
            "formatted": "2026-07-31 13:32:34.293000",
            "since_epoch": 1785504754293000,
            "unit": "microseconds"
        },
        "stopped": {
            "formatted": "2026-07-31 13:32:44.557000",
            "since_epoch": 1785504764557000,
            "unit": "microseconds"
        },
        "worker": "worker:8080"
    }
]
Stop Worker and CLI
You can stop everything by shutting down the Compose stack.
docker compose down